This guide will help you to install Windows 10 and Ubuntu as dual boot in a system.
WARNING: Before proceeding with the instructions below, ensure you have taken a backup and created a recovery USB stick for Windows 10 because you may end up with a broken system. Also, you should know that the below instructions are specific to a configuration (however, they should work in most of the Laptop hardware), but the mileage may vary.
Installing Ubuntu and other Linux OS as dual boot is difficult in pre-installed Windows Laptops due to certain features and restrictions. Secure boot, fast boot, SATA AHCI modes – all these options make it a bit complicated to make a system dual boot with Windows 10 and Ubuntu, especially for general users.
Here are the steps.
Table of Contents
Prerequisite
- Laptop with OEM installed Windows 10
- One USB stick min 16GB for Windows 10 recovery
- One USB stick with the latest bootable Ubuntu. To create an Ubuntu bootable stick, use Rufus. Follow below detailed instructions:
How to create Ubuntu bootable USB using Rufus in Windows
Backup and Recovery
Before you begin, make sure you take a backup of your personal data to a USB stick. Also, for Windows 10 system files, create a recovery stick. Follow the below instructions to create a recovery USB.
- Insert an empty 16GB+ USB stick into Windows 10 machine
- Open Control Panel
- Search with ‘recovery’
- Click on Create a recovery drive

- Wait till the recovery is complete. Once completed, safely remove the USB stick from the machine
You can check whether the recovery stick works by booting from it to be safe.
Create Partition for Ubuntu
If you already have a partition that you can use to install Ubuntu, you may want to skip this step.
OEM-installed machines with Windows 10 typically comes with two basic partitions (excluding the recovery partitions). C:\ and D:\. C Drive contains Windows 10 system files, and D Drive is reserved for user data. Ubuntu (18.04) needs a minimum of 25GB storage space partition, which we need to create by shrinking C:\ drive, which typically contains most of the space. Follow the below steps to create a partition for Linux.
- Open the partition editor from the START menu by searching ‘partition’.
- Right-click on C Drive and click ‘Shrink Volume’.

- In the next window, you can see the available size available in MB. Enter the value as per your need in MB in the ‘amount of space to shrink in MB’.
Tip: If you need 50 GB for partition – enter 50*1024= 51200 MB

- Click ‘Shrink’ and wait until it finishes.
- You will see an unallocated space created in a graphical display of your storage. This space would be used to install Ubuntu. Do not format now, as the Ubuntu installer would allow you to format during installation.
Configure BIOS to change SATA to AHCI
You can skip this step if your system’s SATA controller mode is set to AHCI. You can check it by entering into BIOS via function keys while booting up.
Ubuntu installer can not detect disk partitions if the SATA controller mode is SATA RAID IDE or Intel RST. If you try to install Ubuntu in the above-created partition with SATA controller mode as SATA RAID IDE or Intel RST, you will encounter the below error: ‘You need at least 8.5 GB disk space to install Ubuntu.”.

To change the SATA controller mode to AHCI, follow the below steps.
- Open ‘cmd’ from the start menu as Administrator.
- Run the below command to turn on the safe mode in the next reboot.
bcdedit /set {current} safeboot minimal
If the above command doesn’t work, run below.
bcdedit /set safeboot minimal
- Reboot the computer and press the respective key multiple times to enter into bios. Keys may vary for different manufacturers. It should be either F2, or F8.
- In BIOS configuration settings, change the SATA controller to AHCI.

- You will get a warning as below. Press Yes.

- Press F10 – save and exit.
- After reboot, Windows 10 would boot into Safe Mode.
- Open ‘cmd’ as Administrator again and run the below commands.
bcdedit /deletevalue {current} safeboot
If the above command doesn’t work, run below.
bcdedit /deletevalue safeboot
- Plugin the Ubuntu bootable USB now and reboot.
Install Ubuntu
Make sure BIOS settings are set to boot from USB. Insert the Ubuntu USB stick and reboot.
- If everything worked well till now, the Ubuntu installer will start from a USB stick.
- Continue to follow the on-screen instruction till the Installation Type window.
- In the Installation Type window, choose ‘Something Else’.

- In the partition list, select the partition which you have created in the first step. Then click Change. In the next window, select mount point as “/” and Type=ext4. Press ok.
- Select the root device in the bootloader installer drop-down. DO NOT choose Windows Bootloader.

- Press ok. And continue the installation and follow the instruction on the screen.
- After installation is complete, the installer will reboot the system. Remove the Ubuntu bootable USB stick before rebooting.
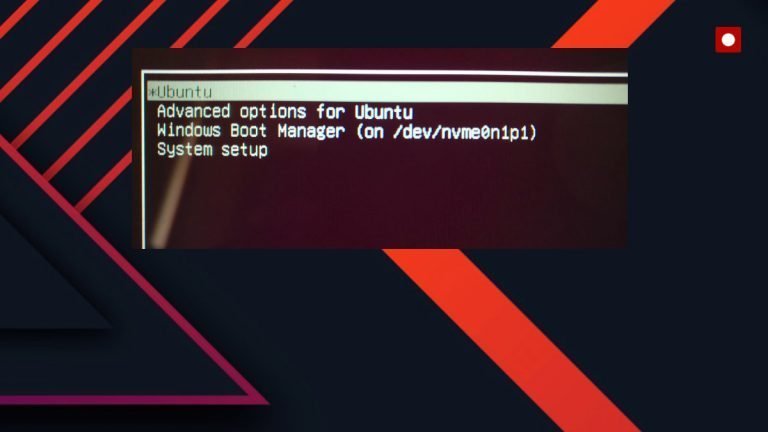
You should be greeted with the GRUB with Windows boot loader and Ubuntu.
Choose your desired OS to proceed.

Conclusion
The above instructions are tested in Lenovo Ideapad Flex 5 series with OEM-installed Windows 10. Drop a comment below if you face difficulties while dual-booting Windows 10 and Ubuntu.
References
Weblinks which have been referred to in this guide.


